
Introduction
You are listening to music in between your study time. And suddenly after your soft song playlist ends, a rock song starts to play. And it hurts your years because the volume of the songs is unbalanced. The rock song starts playing loudly and it almost bursts your ear off. This is because the Sound Check feature is not enabled on your iPhone. Let us know more about it.

What is Sound Check on iPhone?
The Sound Check feature on iPhone is very useful since its purpose is to balance the volume of the sound and keep it consistent for a long period of time. Let us take an example to make this clear as water.
We have often heard music for longer hours and we have notably observed that each of the music track have different levels of sound. Some of the songs that will listen to are quiet music while others are louder. Now when we shift from a soft song to a loud one, we can gradually understand that the levels of the volume are boosted. The Sound Check feature helps to balance this out by making sure that the volume of the loud song is just as the volume of the soft song.
Also Read: Learn how to share location on iPhone with the Find My app
This ensures that we don’t end up listening to loud music for longer periods which can damage our ears.
Easy steps to enable the Sound Check feature on your iPhone
1. Go to Settings.
2. Then scroll down and find the Music option. Click on it.
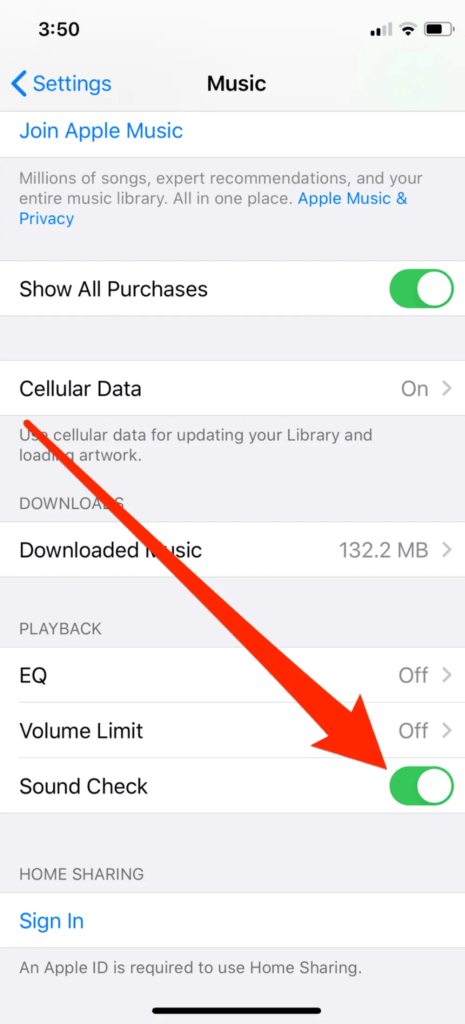
3. The Music page will appear. Again scroll down and you can find the Sound Check option in the Playback section.
4. You can notice a switch beside the Sound Check option. To enable this feature, you have to turn on this green switch.
For ensuring this, go to Apple music and put two songs on your queue. One should be a soft song and another should be a loud one. You will understand the difference as the queue moves from the soft song to the loud one. The volume will be balanced.
How to disable Sound Check on iPhone
1. Go to Settings.
2. Tap on the Music option.
3. Scroll down to the Playback option. And then tap the switch beside the Sound Check option. This means you have to simply turn it off.
And the Sound Check feature will be disabled in your iPhone.
You need to remember this:
Sound Check is a feature that is available only on the Apple stock music app. This feature does not work in other music apps like Spotify, Gaana, Wynk music, etc.
This means that the consistent volume level will only work when you listen from Apple Music and not from any other music apps.
Conclusion
It is extremely harmful to keep on hearing loud music for long periods of time. It ends up damaging our ears after all even though it does not show any effects on the spot. Thus, if you are an iPhone user, you should always listen from the Apple Music store with the Sound Check option enabled. This will prevent your ears from bleeding out. Other than the health advantage, Sound Check in your iPhone is really helpful during official hours like during official work meetings or important discussions. And these are only two of the many advantages the Sound Check feature has.
For more helpful articles like this, check our website. And do not forget to leave a comment down below if this helped you!